Managing speakers and exporting transcripts
How to keep your speaker roster tidy and download a finished transcript in the format you need.
This guide covers two everyday tasks: keeping your speaker roster tidy, and reading or downloading a finished transcript in the format you need.
Voxint runs on your own machine. Open the console at http://127.0.0.1:8080/ and sign in with the username and password you set during setup.
The speaker roster is Voxint's memory of who's who
Every time you tell Voxint "this voice is Maria Chen," it remembers her voice. The next recording you process, Voxint listens for that same voice and suggests "this might be Maria Chen" for you to confirm. The more voices you enroll, the more work Voxint can do for you up front.
Two things to understand from the start:
- The roster grows as you use it. It starts empty. It fills up as you enroll voices from your recordings. Matching is done by voice, using the sound of the speech itself, not by name.
- Your rulings are permanent history. When you confirm who a speaker is on a past recording, that decision is kept for good. Nothing you do on the roster later (renaming, merging, archiving) rewrites the decisions you already made on finished recordings.
The roster
Open Speakers in the sidebar (or go to http://127.0.0.1:8080/speakers). The roster is a table showing each speaker's initials badge, name, status (verified, needs review, or unknown), file count, minutes of speech, voice match strength, and when they were last heard. An amber TO DO strip at the top calls out voices waiting for a name and pending name suggestions. If two or more speakers look like they might be the same person (high voice-match similarity), a Possible duplicates card appears below the TO DO strip, prompting you to review and merge them if appropriate.
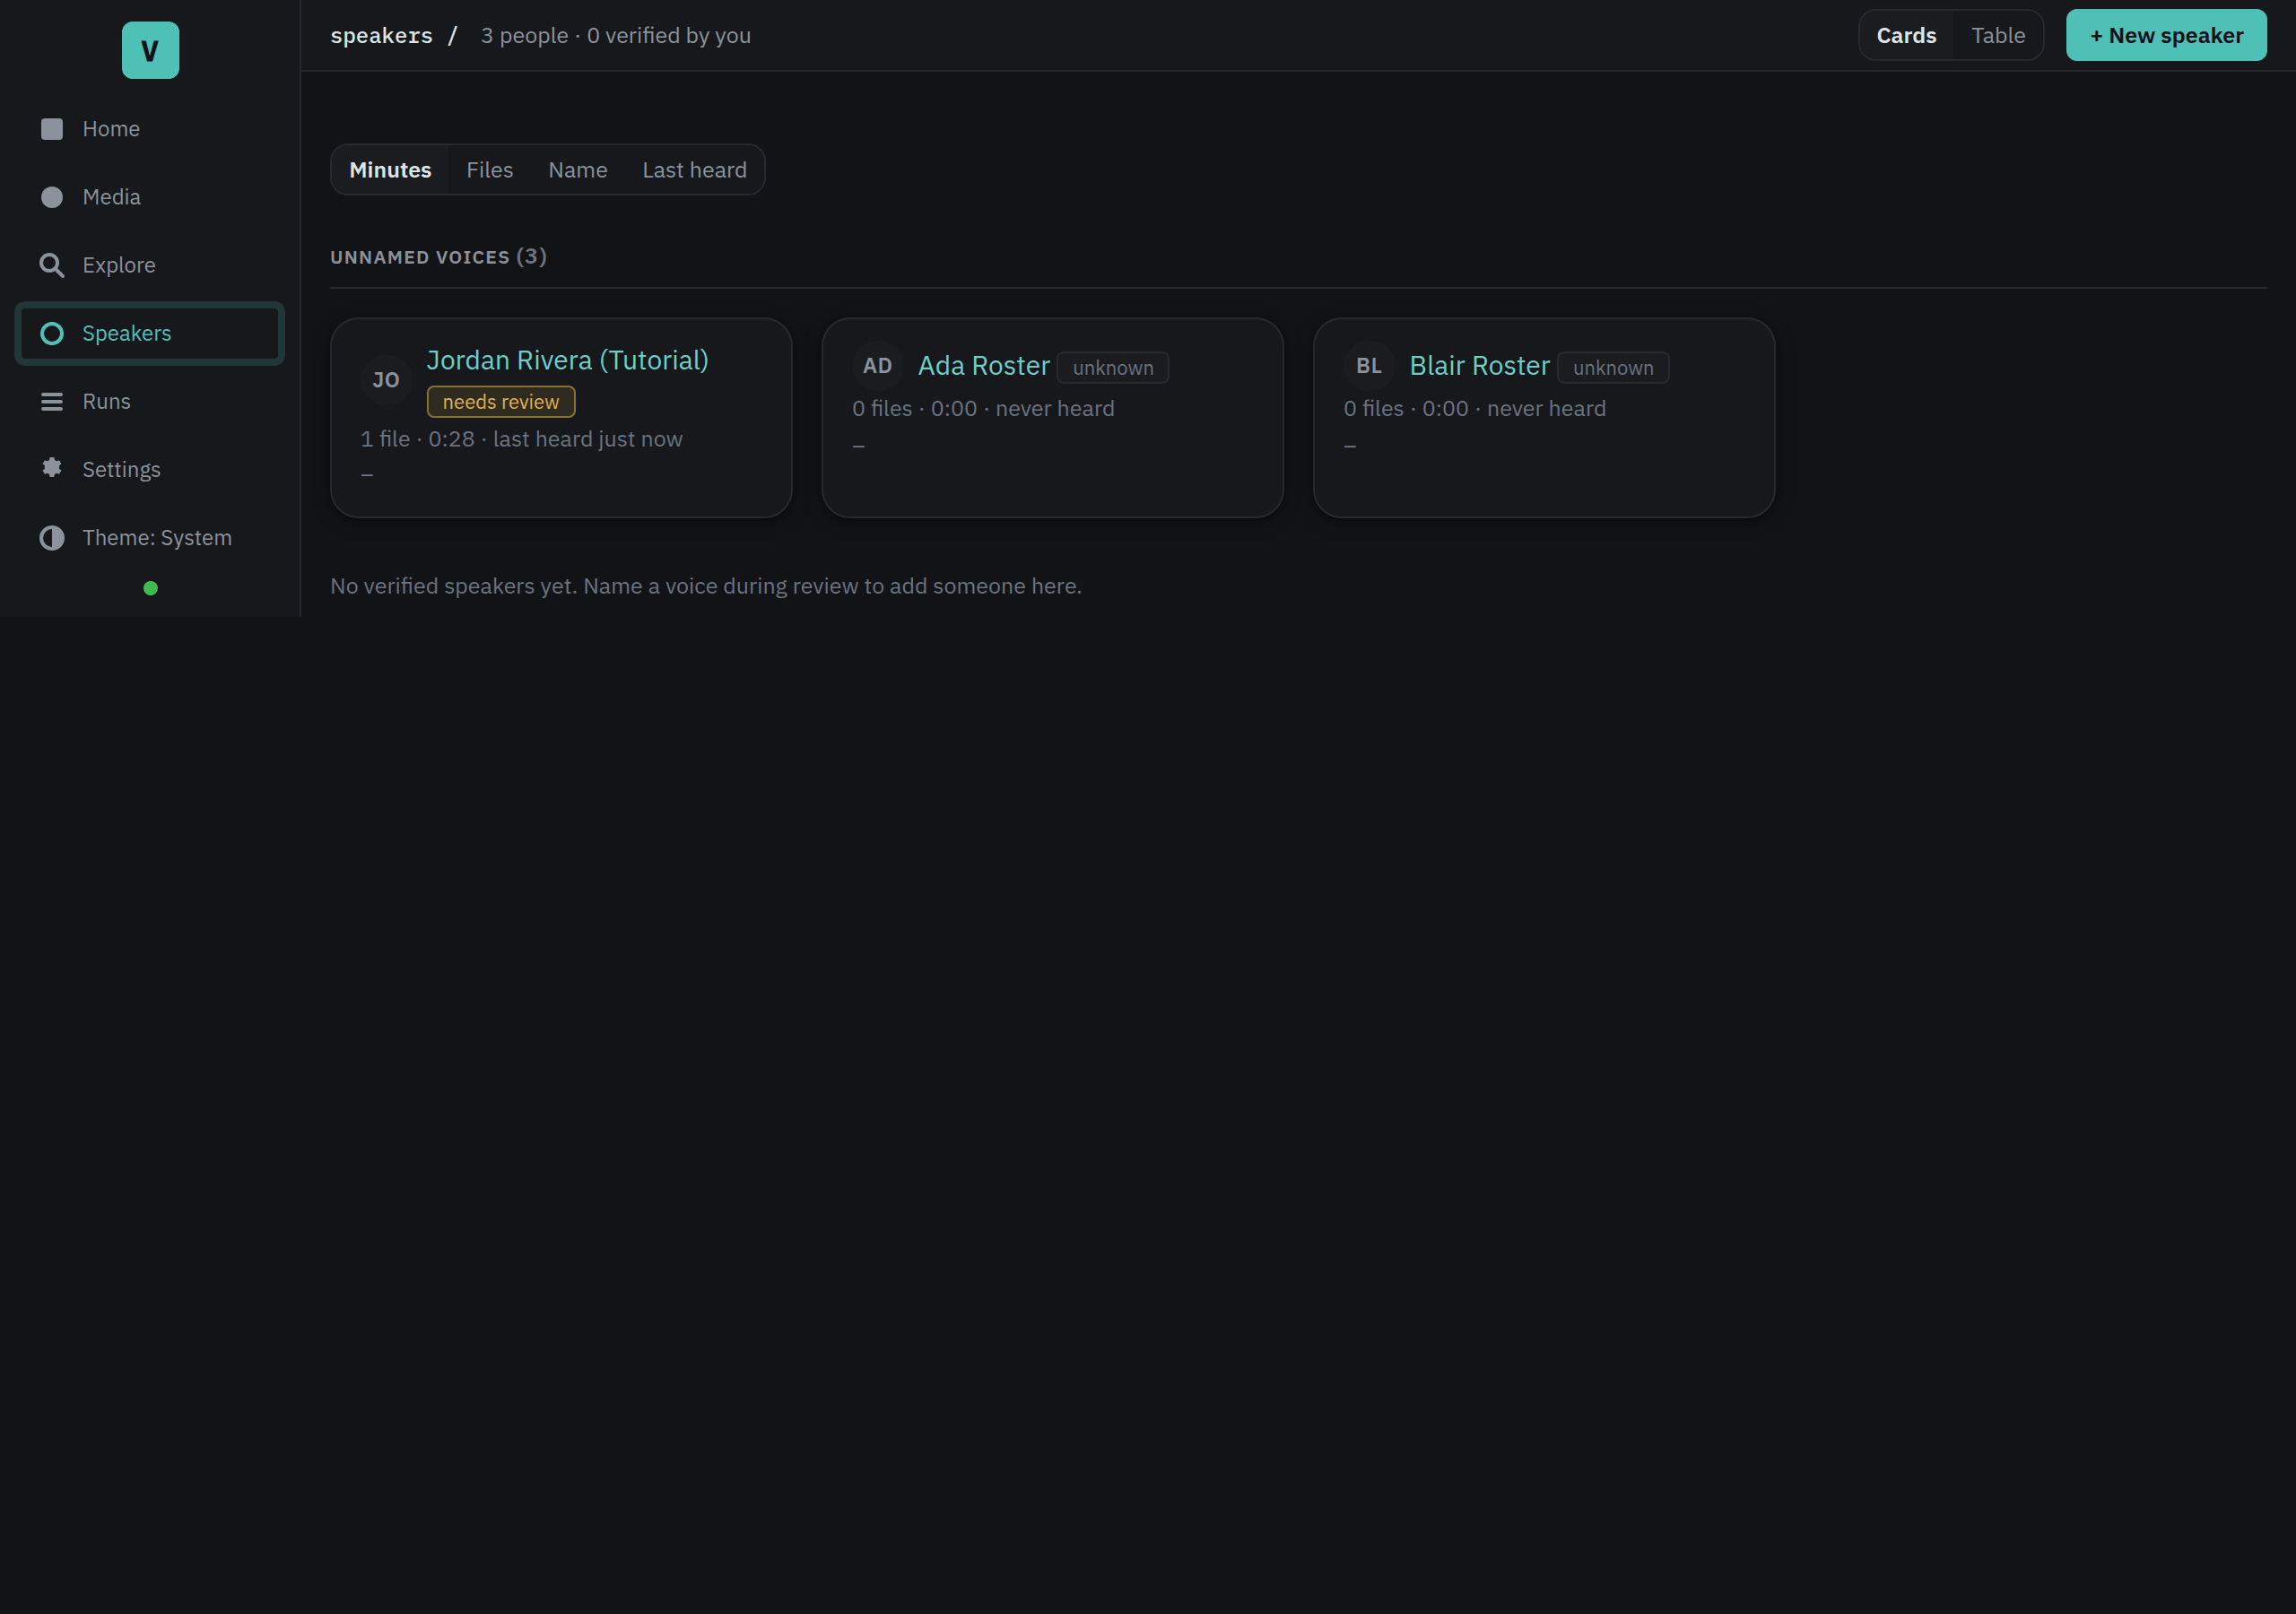
Click Open on any row to see the speaker's detail page, which shows stat tiles (recordings, speaking time, segments, match strength, first and last heard), a profile panel, and a heard-in table listing every recording the speaker appears in.
Here is what you can do from these pages.
Rename a speaker
Type the corrected name into the name box and click Rename. Use this to fix a typo, or to replace a placeholder like "Interviewer" with a real name once you know it. Renaming only changes the label; it does not disturb any recording's decisions.
Merge duplicates
Sometimes the same person gets enrolled twice under two different names, for example "Maria" on one recording and "Maria Chen" on another. Merging joins them back into one speaker.
On the duplicate speaker's row, pick the speaker to merge it into from the drop-down, then click Merge and confirm. The duplicate's voice samples and its machine proposals move over to the speaker you kept. Merge cannot be undone, so check that the two are truly the same person first.
Merging does not rewrite the decisions on any past recording. It only changes which single speaker those voice samples now belong to going forward.
Archive a mistake (kept as history, not destroyed)
If you enrolled a speaker by accident, or a speaker you no longer want Voxint to match against, click Archive and confirm. An archived speaker:
- leaves speaker matching, so Voxint stops suggesting them on new recordings,
- has its machine proposals removed,
- but is kept, not deleted; you can restore it later.
Archiving is reversible and non-destructive. It is the safe way to clear a mistake without losing anything.
Restore an archived speaker
Archived and merged speakers move into a Former speakers section at the bottom of the page. For an archived speaker, click Restore to bring it back into active matching. (A merged speaker is listed there for the record but is not restored individually; its voice samples now live with the speaker you merged it into.)
Remove a bad voice sample
Open a speaker's detail page to see the individual voice samples Voxint holds for them, each with the date and the recording it came from. If one sample was captured from the wrong voice, click Remove next to it and confirm. That sample and any machine proposals that came from it are removed. The decision history on past recordings stays intact.
One caution the page will show you: if you remove a speaker's last voice sample, Voxint has nothing left to match them by, so it can no longer suggest that speaker on future recordings until you enroll a new sample.
How a voice joins the roster
Speakers get onto the roster from the speaker rail, while you are reviewing
a recording. When Voxint has separated the voices, it shows them as labels like
SPEAKER_00. On the label for a voice you recognise, open the speaker picker,
type the name you want, and choose Create "[name]" to add them on the fly.
That creates a roster speaker from the voice. You can also type to filter
existing speakers by name and select one with the arrow keys and Enter.
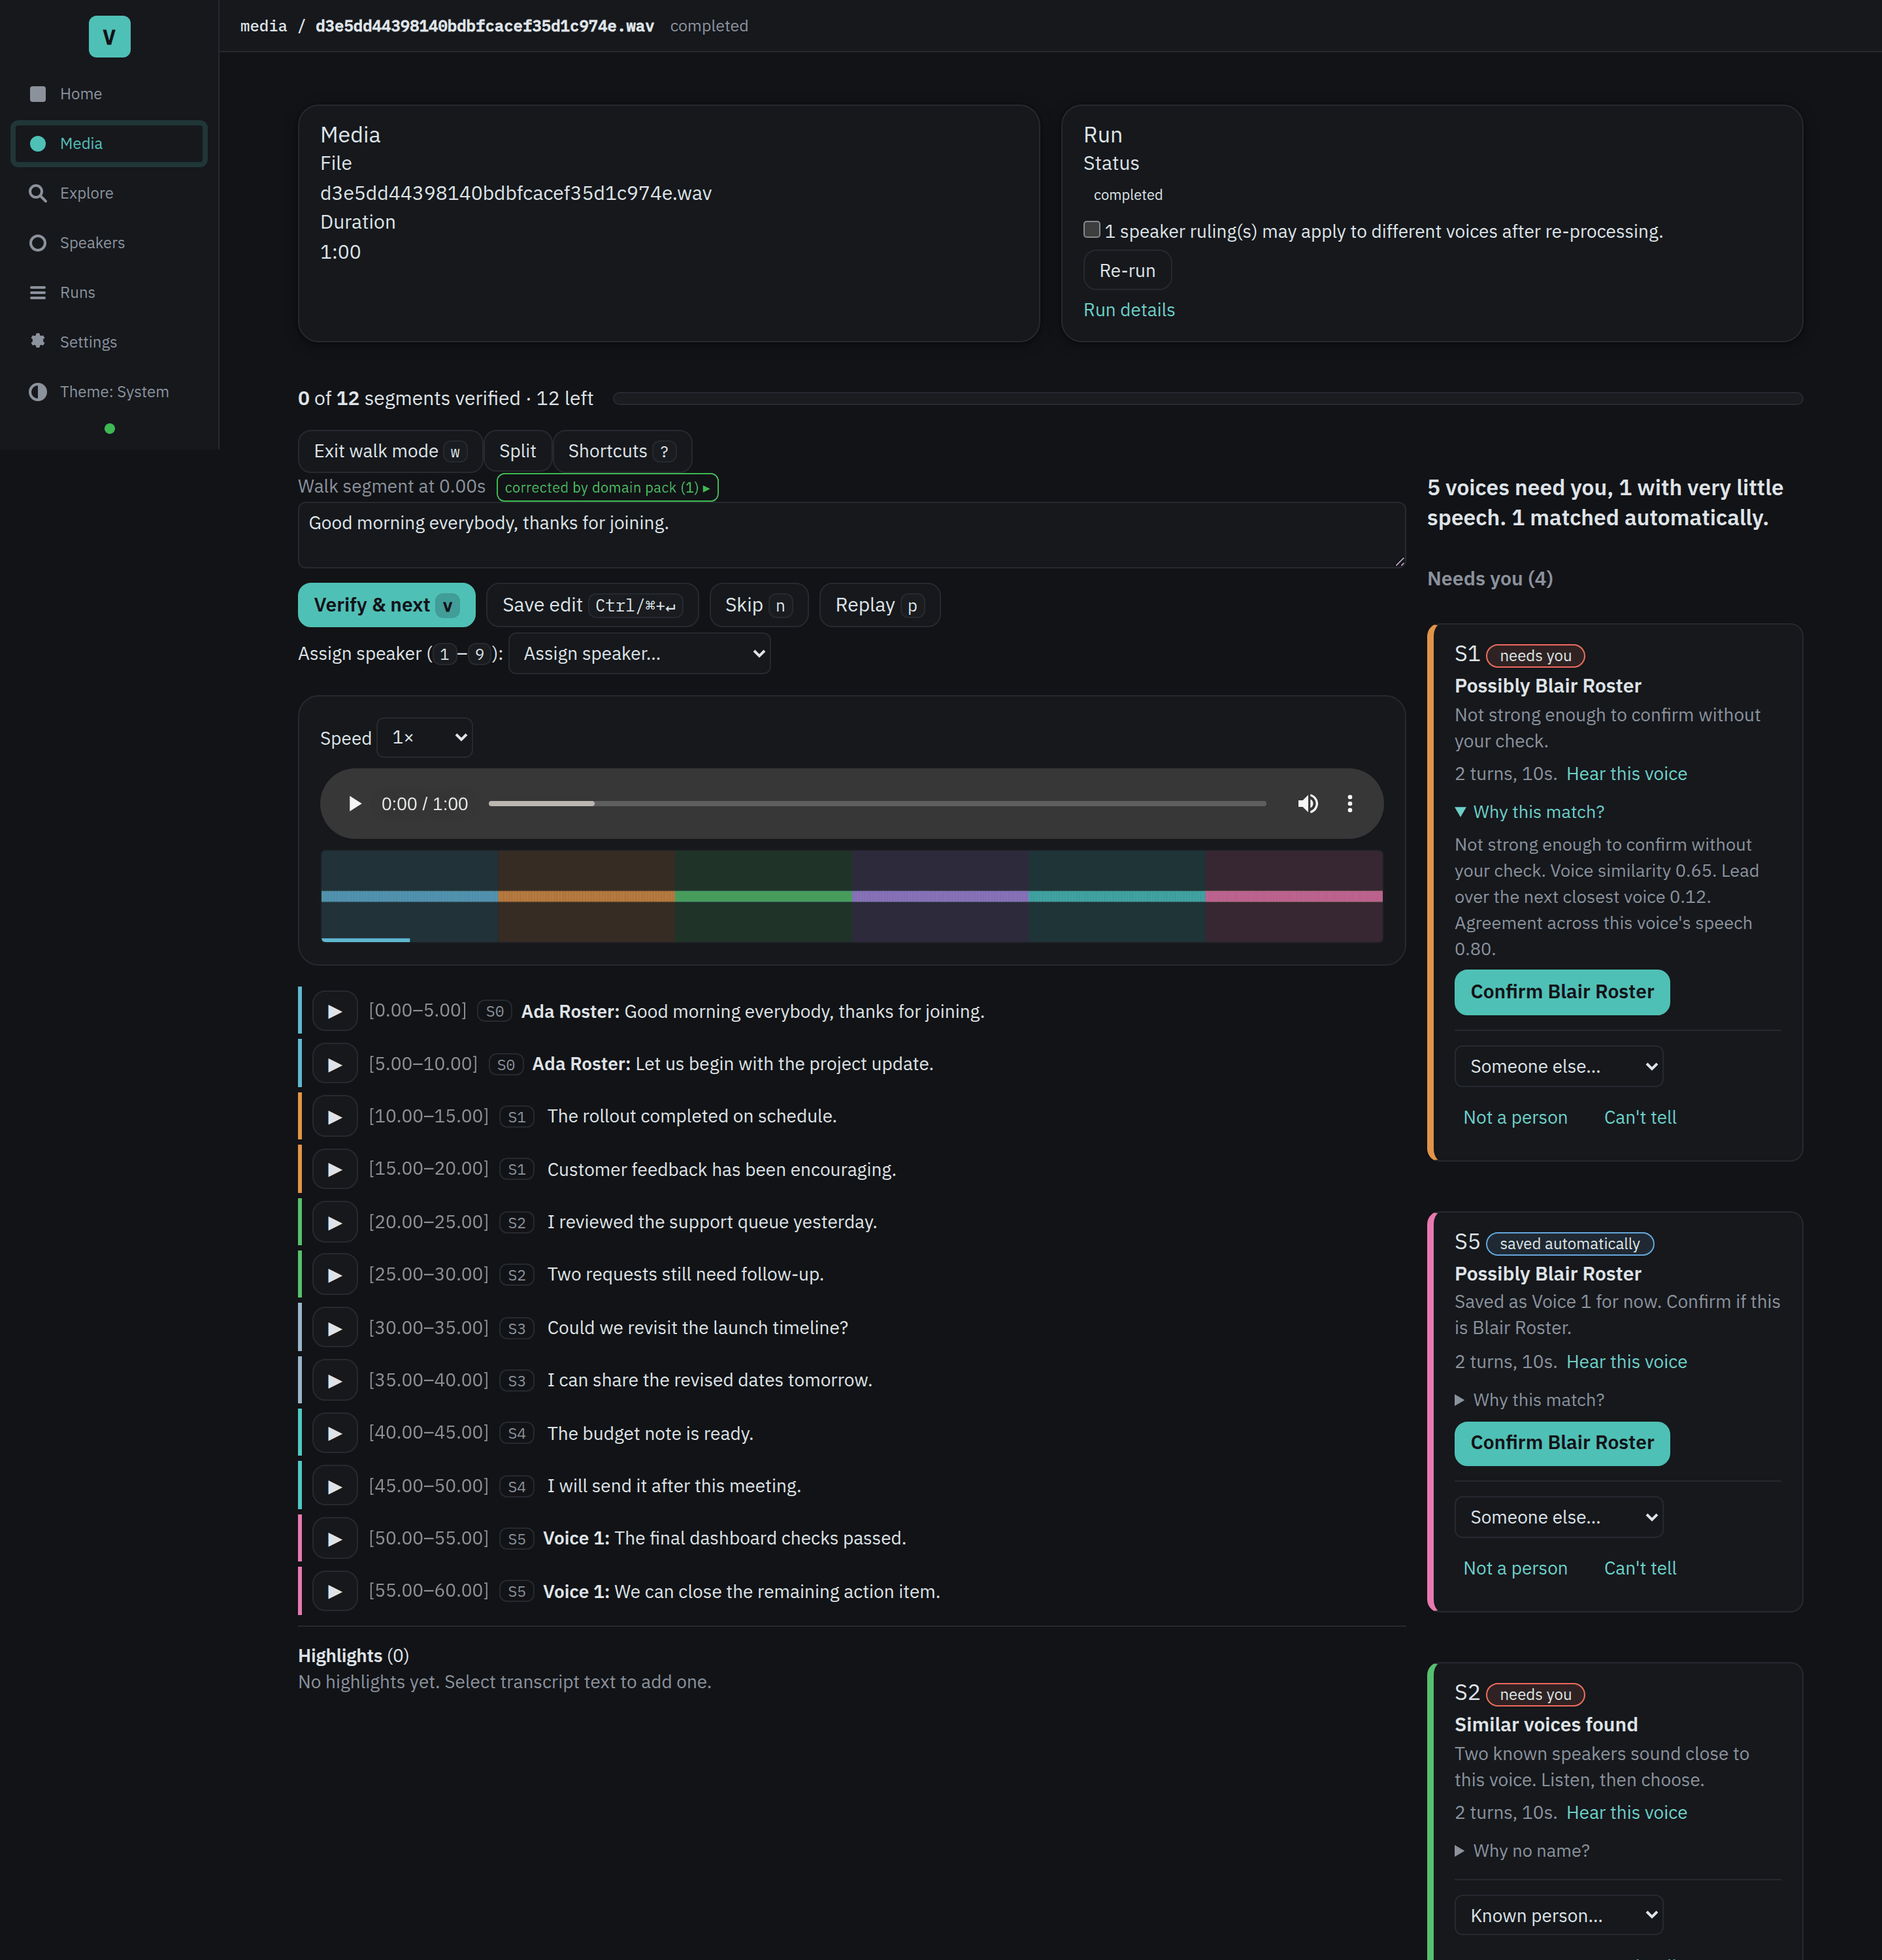
Voxint can also save a clear new voice automatically under a temporary name such as Voice 4. The Matched automatically group links to the Speakers page, where you can give that person their name.
From that point on, the enrolled voice becomes a match candidate: on later recordings, Voxint compares each voice against your roster. A strong match is shown as that speaker automatically. Use Change in the speaker rail if it is wrong.
For the full walkthrough of assigning, adding, and confirming speakers on a recording, see Reviewing and adjudicating.
Optional: research a speaker on the web
Voxint can optionally look a speaker up on the web to gather background about who they might be, then hand you draft notes to review. This is off by default. It only becomes available when you have turned on web research, configured a search provider, and enabled LLM enhancement, all in Settings. If you have not set those up, the speaker card simply says web research is off and points you to Settings.
When it is available, a speaker's card offers Research this speaker, runs within a small fixed budget of searches and page reads, and produces profile drafts for you to accept or discard. It never changes a speaker's identity on its own; like everything else, it proposes and you decide.
Read or export a transcript
Once a recording has finished processing, you can read it on screen or download it in the format you need. Open the run from the workbench or the transcript page.
Read it on screen
Click Read on screen in the Download transcript menu. This opens a clean reading view: one heading per speaker followed by that speaker's words as plain paragraphs, with none of the per-line clutter the review player shows. It is the quickest way to read a finished transcript or share your screen with someone.
Two links let you adjust the view:
- Show timestamps / Hide timestamps turns the per-paragraph times on and off. The reading view opens without times, which reads best for sharing.
- Exit reading view returns you to the audio-synced player.
Download a file
Click Download transcript to open the format picker. It lists every format with a short description, and each link downloads the reviewed text by default (the text as you approved it in the console).
If you need the enhanced or raw wording instead, expand Other text variants at the bottom of the picker:
- Reviewed is the text as you approved it, the everyday choice.
- Enhanced is the cleaned-up wording from before you reviewed it.
- Raw is the exact words the transcriber produced.
Plain text and Markdown also offer a reading copy (no timestamps) alongside the timed version.
If you have translated the transcript, the menu also lists a row of downloads per translated language. See Translate transcripts.
The Highlights panel also offers a bundled quote download. Click Bundle on one highlight to download its Markdown pull quote, a JSON file recording where it came from, and its audio clip when you have extracted one, all in a single ZIP file. Click Download all (.zip) to do the same for every highlight shown by your current tag filter.
| Format | Use this when… |
|---|---|
.txt (plain text) |
You want a readable transcript to open in a text editor or word processor, or to quote into a document. Choose the reading copy for clean pasting. |
.md (Markdown) |
You want a formatted document with a heading for each speaker and their words as quoted paragraphs. Markdown opens in notes apps, wikis, and static-site tools, and reads fine as plain text too. |
.srt (SubRip subtitles) |
You are captioning a video in most players, editors, or on video platforms. |
.vtt (WebVTT subtitles) |
You are captioning video for a web page or web video player. |
.json (structured data) |
You are feeding the transcript into another tool, or archiving it as structured segments (each with start time, end time, speaker, and text). |
.rttm (diarization turns) |
You are using speaker-diarization research or scoring tools that expect this format. See the caveat below. |
What a Markdown export looks like
Each run of one speaker's lines becomes a heading followed by a single quoted paragraph. With timestamps on, the paragraph opens with the start and end time of that run in brackets:
## Maria Chen

> [00:00:00.000–00:00:12.480] Thanks for having me on the show.

## Interviewer

> [00:00:12.480–00:00:15.900] Glad you could make it.
The reading copy is the same, without the bracketed times. Special characters in the transcript are written literally, so a stray symbol at the start of a line cannot turn into an accidental heading, list, or other formatting. A web address in the text stays as text, though some viewers will still make it clickable.
Speaker names always appear
Every text, Markdown, subtitle, and data export labels each passage with the speaker. There is no switch to drop the names, because a transcript without "who said what" is rarely useful and captions need it. If you want to share a transcript without real names, rename the speakers on the roster first (for example to "Participant A"), then export. An export always uses whatever names the roster holds at that moment.
Which files show your speaker names
This distinction matters:
.txt,.md,.srt,.vtt, and.jsoncarry the speaker names you adjudicated. If you assigned a label to "Maria Chen," that is the name these files show..rttmdoes not. RTTM is a diarization interchange format, and it carries the raw diarization labels (SPEAKER_00,SPEAKER_01, …) with their timing, never the names you assigned. It records who-spoke-when as the machine heard it, so it can be scored against other diarization tools. If you open an.rttmfile expecting your speaker names, they will not be there, and that is by design.
If you want the timeline of who-spoke-when with your assigned names, use
.json rather than .rttm.
Where to go next
- Reviewing and adjudicating: assign, enroll, and confirm speakers on a recording; correct the transcript.
- The other how-to guides in this folder cover getting recordings into Voxint and understanding your results.
- First-run onboarding: the guided installer, the setup wizard, and the bundled tutorial.
- Setup: installing and configuring Voxint.
Related guides
- Add media & manage runs
- Review & adjudicate
- Translate transcripts
- Settings & troubleshooting
- Setup: install Voxint on your OS and hardware.
- First-run walkthrough: the setup wizard and guided tutorial.